Showing posts with label Copics. Show all posts

Sunday, March 4, 2012

Spring Flowers


A very Good Morning to you all, I hope you are having a good weekend.

As it's the first Sunday in the month it means it's time for new challenges at Sir Stampalot and Penny Black and More, the card at the top is one of my DT pieces for the latter.

At Stampalot it's a challenging month for the DT as I set then all a task of creating two cards with two kits. I sent them all two kits of products much the same and today we are revealing what they came up with using the pearls and swirls kit...................their other makes will be shared later in the month. Of course I didn't expect to escape the challenge myself and here is what I came up with, but you really do need to go over the the challenge blog to see everyone else's wonderful work and to see what the theme is.


The DP's which form the basis of my card...........yep another easel...............are Alla Prima and I used one sheet to make the rosette onto which I added the focal image which is Hero Arts K5576 Newspaper Tulips which I inked with TH Mustard Seed, embossed with detail clear them sponged with TH tumbled glass.

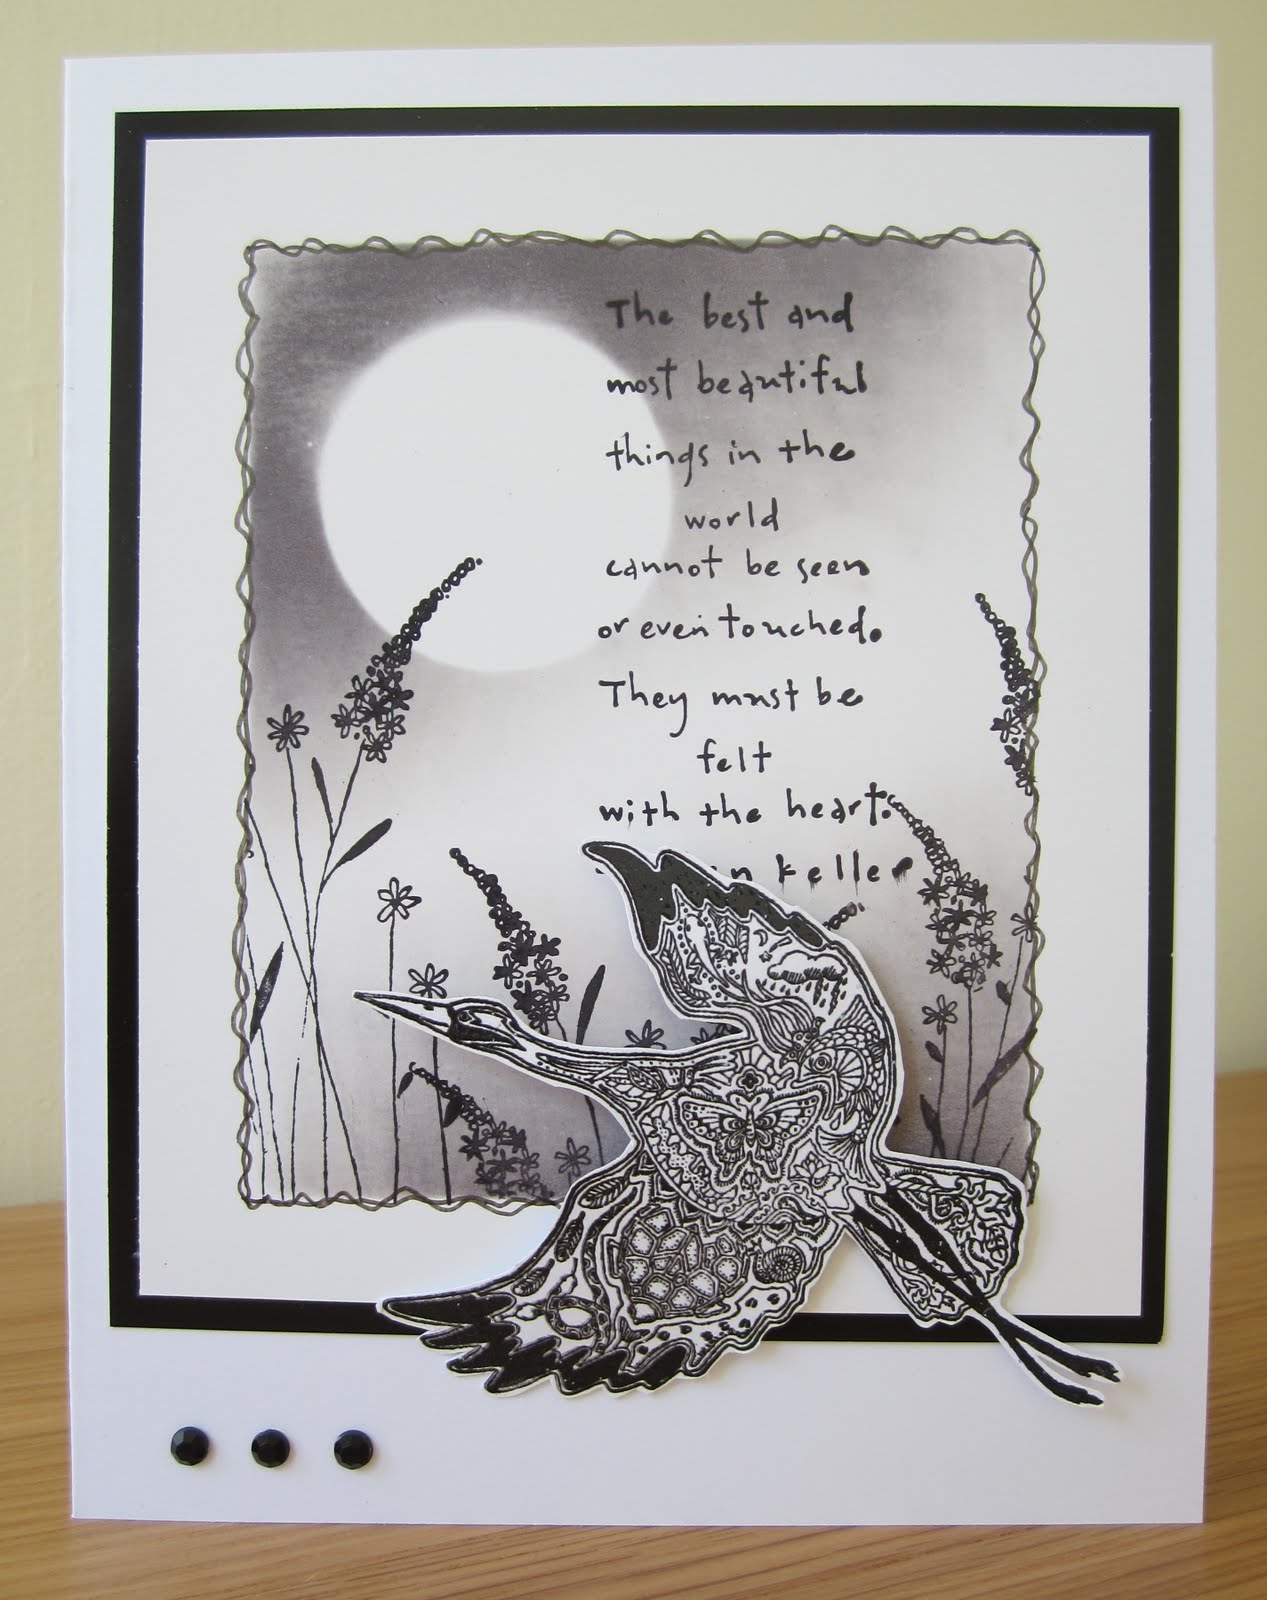
Springtime is the theme at Penny Black and More this month, my favourite time of year so the theme was inevitable. I have ended up with three DT cards as the new release stamps from the Full of Surprises collection literally just landed here in the UK so I had to get inking and you will see two of the stamps on my card at the top of this post. The flowers are a Penny Black slapstick stamp 40-104 Spring Beauty so that had to be used for this months theme and the sentiment is PB 4263F Garden of Life. Both were stamped onto Fabriano watercolour card and embossed with detail clear, then coloured with Derwent watercolour pencils from the beautiful wooden box collection of 48 hubby bought me this last week.

The borders are cut with some of the new TH border dies using My Minds Eye DP which I also used for the mat behind the image cut with Go Create dies. The little embellies are some new metal ones called Floral Spacers from Stampalot which have holes through the middle for brads, although I just stuck mine on and added swarovsky crystals to the centres.


For my second card, I stamped Penny Black 3381K Aspire with Adirondack citrus and meadow, then stamped over this with Penny Black 3157H Growing Free using versafine black, cut out with Nesties 20 and layered onto a black panel cut with Nesties Fleur de Lis rectangle. That back panel is embossed with a Sizzix folder and I added some ribbon, leaves and flowers made from organza ribbon.


And finally just one more that was already in the mix before the new stamps landed, the technique is a bit involved so I will try and explain best I can. Please do mail me and ask if any part is not as clear as it might be.


For this second Penny Black DT piece I started by stamping the two images Penny Black 4039K Candid and 1483E Cherish Yesteday................as you can tell by the code this is a real oldie..............with archival black ink onto a piece of double sided adhesive. To do this I peeled away one side to do the stamping then placed the covering back on top but leaving about 1cm of the sticky showing at one end. Onto this exposed area I placed a piece of acetate cut ready to the size of the sticky piece and gradually peeled away the backing to allow me to lay the acetate directly onto the stamping.

Next I took a piece of tissue, scrunched it up and lightly inked using direct to paper with TH mustard seed, shabby shutters, sage used sparingly and Versamark champagne to add a bit of sparkle. I scrunched the tissue a bit more between each inking to expose more creases to pick up the ink. When I was happy with the tissue, I removed the reverse side of the double sided sticky paper and placed the tissue onto it.

Working from the tissue side I gently coloured the flowers with Copics..................doing this over a light source or against a window helps. You need to be a bit gentle so as not to tear the tissue, but it's amazing how much colour you can add at this stage. Finally I matted and layered onto the base card which I randomly stamped down one side with Hero Arts H2365 Old French Writing, a punched border, some pearls and cord. Finito !

I really hope you will be able to join in our challenges this month and look forward to popping over to your blogs to see what you created.

Wednesday, February 29, 2012

Easter basket tutorial and Cup Winners


Good Morning, hope everyone had a good weekend and saw a bit of the lovely sunshine we had here in the Fens, it was really beautiful and Sunday quite warm as there was little or no wind.

Before I can talk craft I have to share a picture of the boys after our win at Wembley yesterday, it was something of a nail biter going to extra time and then penalties, but we got there in the end and are assured of  European footie next season, not to mention another trophy in the cabinet at Anfield. For those of you totally lost and not as mad and fanatical about footie as I am, I mean Liverpool FC !!


Silliness over, on to some craft and I thought I would share one of the little Easter baskets I have been making, the inspiration actually came from a demo I saw on TV for a rather expensive score board and it got me thinking I could probably come up with something similar using my cheapie MDF board which I've had for yonks and hey presto it worked a treat, so here is my take on the basket.


It's a really basic design and I am sure most of you can suss it out for yourself, but just in case I've done a few photos with sizes to help. Above is what I used for mine, one sheet of A4 linen cardstock, I 12x12 sheet DP, some ribbons, CopicsAquamarkers, scoring tool four eyelets, Nesie and stamp for the image which is Penny Black 2665K Blush and I also used Adirondack raspberry for the main part of the flower.


Start by cutting the A4 sheet of card down to a 21cm square  and score in both directions at 7cm intervals so your piece is divided into nine equal squares, the score the four corner squares diagonally as above. Crease all scored lines and you will see the shape of the basket coming together. The four diagonal corners scores need to be carefully folded inwards.

Next cut 17 - 6.5x6.5cm squares from the sheet of DP, leave 9 whole and cut the other eight in half diagonally, then stick all into place as below. Both sides will look the same with just one centre square blank, that will be your base.

Note: the basket in the picture at the top was my prototype and I didn't cover the folded in flaps, so if you prefer to do it that way to get some contrast you will only need nine of the 6.5cm squares and they won't need cutting in half as you will only be covering the whole squares, five inside and four on the outside.


Stamp your image four times and cut out with a Nestie, I then ran a Copic round the edge rather than matting and layering so as not to add too much weight. Stick on the four outer squares.......make sure you get them the right way up and not upside down as I did on my first attempt !!


Finally pop an eyelet into each of the four corners, draw the basket up into shape and thread ribbon through the eyelets. And walla, you have a pretty little basket to fill with goodies. I will share this pink and green version another day.


And of course you can change the size to larger or smaller, all you need to remember is that your chosen size will divide evenly by three so you get nine equal squares.

Monday, February 20, 2012

A fairy called Henrietta


Would you believe it's taken me all day to get this post up, or to be more precise to get the picture loaded, Blogger was having non of it and seems to have fallen into his old ways of having Monday hissy fits.

I had another play with my ink dusters and created the background for this one with Adirondack butterscotch, purple and hazelnut. The fairy which I have totally fallen in love with is a new one called Henrietta from Lavinia stamps..........she also comes in a smaller silhouette stamp and before you ask, yes I got that one as well. The poppies and branches round the edge are also Lavinia and I also stamped the poppies with the same purple ink onto the lilac base paper. I stamped Henrietta with versafine black and embossed with detail clear before colouring with Copics and adding the obligatory glitter.

The easel card was made using the new Go Create arch dies and the borders are cut from Spellbinder Fleur de Lis dies. To finish I made a rose made with a five petal punch, white paper and inked with the same purple round the edges.

Thanks for dropping by and have a good Monday evening.

Saturday, February 18, 2012

Crocuses in bloom


Hello all, it's Free and Easy week three at Allsorts and my lovely teamie Fleur is in charge this week.

Our sponsor is Ruth from A Passion for Stamps so it gives me the perfect opportunity to use her lovely new crocus image.

Crocuses along with snowdrops always herald the promise of Spring, although there's not a sight of them coming through here in the Fens yet, the snow probably sent them back underground, but hopefully soon they will soon be showing their pretty faces.

For the top card I printed on to Fabriano watercolour card and coloured in with my new Derwent watercolours. I masked a sun and lightly dusted Adirondack butterscotch using a Inkylicious ink duster...........I'm a newbie to these but think I am going to get a real liking for them and have more makes to share shortly............then sponged some rays of sun coming down onto the crocuses. The shapes were all created using the new Go Create die set that seemed to fall into my basket at Stamperama last week, I just love the shape and have been on the lookout for an arch for ages, so was one really happy bunny when I spied them on the rack.

For my second card using the same image I printed onto Copic cardstock and coloured with Copics. The background DP is Magnolia, some lace, a seam binding bow a button and bakers twine.................does anyone know why it's called that ?


Before I go I need to let you know who Mr Randon Org., picked our of the hat to win my little giveaway earlier this week and I am pleased to say it's Caroline.........................I'm not sure if we know each other Caroline and no idea where you are in the world, but it's always lovely to meet someone new, so please mail me brenda@ibas.co.uk with your full postal addy.

Thanks for popping by and enjoy your weekend.

Saturday, February 11, 2012

Paradise Isle


Hello Peeps, first off I must send a little message to those blog peeps I am hoping to meet at Stamperama tomorrow, hopefully our plans will fall into place, but we are very white here again and the roads decidedly dodgy, plus my legs are still MIA and I've had to pocket my pride and resort to to my wheelchair this past week so taking it all into account, will have to play it totally by ear come tomorrow.

Things have a habit of taking twice as long when my mobility goes out of the window and my mind is always half an hour ahead of my body, so I have been a bad, bad blogger this week and not helped by the fact my keyboard and mouse seem to have all but died on me and typing just a few words is taking forever...........would you believe I started typing this at 6am and now it's nearly eight, I've tried new batteries and all sorts and last night resorted to ordering a new one from Amazon.

So, better move on to tell you about Allsorts  where it's my turn to host the challenge where we are continuing with our Free and Easy February. And for my DT piece I thought an inky session was in order and have created a tropical scene using a collection of  Stampscapes images, Adirondack dye inks watermelon, cloudy blue and hazelnut, a little colouring with Copics and of course a masked moon with sponged sky and sea brayered with the Speedball.

I know lots of peeps think brayering is a bit of a scary pastime, but believe me it really is not and is the perfect way to make a fairly swift card. So if you've got a brayer collecting dust, get it out and have some fun..............and as I say at the top of my blog, just mail me if you need some help.

Have a good weekend and thank you so much for dropping by.    

Tuesday, January 31, 2012

Spring Bluebells


Good Morning from the dull, misty, cold and basically pretty miserable Fens, but I am keeping positive and hoping for a glimmer of sunshine if for no other reason so I can take some photos of my latest makes. And I keep reminding myself Spring is not so far away, judging by the garden the bulbs certainly think so.

So just a quick couple of shares before I head off for my routine bloods, I'm still pretty immobile and the pain is as fierce as ever at times, in fact I reckon I could move backwards quicker then forwards, so needless to say I can't even contemplate driving and hubby is taking me.

But all is positive on the crafty front.......a girl has to do something to pass the time and I do find like so many of you that it helps absorb the mind and the pain seem less evident. Both my cards are made with Ruth's wonderful artwork which you can grab for yourself at A Passion for Stamps. Ruth has drawn some lovely new Spring crocuses which I will be sharing with you shortly and also some very sweet love birds which I need to put to use this week.

My card up top uses the beautiful bluebells, printed onto Fabriano watercolour card, heat embossed with detail clear.....you know my method of throwing the powder on as it comes through the printer and coloured with Aquamarkers. The DP is Nitwits, the roses cut with a Marianne die and the swirl is a Memory Box die, aren't they just so delicate.


My second card is Ruth's columbine printed onto acetate, then placed on one side of a piece of double sided sticky sheet. The reverse is a piece of white tissue paper scrunched up and inked with TH broken china, old paper and stormy sky, then stuck to the reverse side of the sticky sheet. The flower is then coloured with Copics from the reverse through the tissue, this technique never fails to fascinate me. The sentiment is a really old PB wood mounted stamp. I picked a couple of laurel leaves to place in front of my card when I did the photo, but they do look like they have measles in the picture don't they ?

Have a good Tuesday everyone, thanks for popping in and I hope you see a bit of sunshine today.

Saturday, January 21, 2012

Needles and Pins


This week at Allsorts the lovely Jo is hosting her very first challenge with the theme "Needles and Pins".

I thought this card which I made for Ruth a while ago but never blogged was ideal for this theme, using her mannequin image which you will find here at A Passion for Stamps. I printed the image onto Fabriano card and coloured lightly with Copics, used some Cosmo Cricket DP and added some lace ribbons and pins to embellish.

A bit of a quick post I'm afraid as struggling with the dysfunctional body a bit, but will hopefully be back with some more work again in the next few days.

Have a lovely weekend and my appreciation for your visits, they always mean so much.

Saturday, December 10, 2011

It Takes Two


Good Monring peeps, how are your Christmas preparations going ? I think I am just about there and tomorrow we have a big family day with about twenty coming, so quite a bit of preparation to be done although I confess M&S are taking a good bit of the effort out of it.

It's my turn to host the theme at Allsorts this week and I would like to see creations on the theme "It Takes Two".................basically use just two colours on your work, but you can use white as well as your base colour.


Two DT cards for me, the one at the top of my post............yellow and black...............uses Ruth's A Passion for Stamps Narcissus image which you will find here, coloured with Aquamarkers and decoupaged onto a mat cut with Nestabilities, stamped with Hero Arts H2635 Old French writing and inked round the edges with TH mustard. The DP is Kasier and the sentiment is Penny Black 3096F.

For the second card I have used one of the Christmas stamps from Stampendous JGS157 which I fell in love with as soon as I saw it and ended up making quite a few with it as it lends itself to all occasions apart from Christmas, in fact I'm not sure I actually made a Christmas card with it.

For this one I stamped the image onto vellum using versafine black and embossed with detail clear. I coloured the image from behind with Copics and decoupaged some of the flowers. I machined round the edge of the Bo Bunny DP and tied a simple seam binding bow at the side. I love the fresh colours of this one, make me think of Spring...................

Our sponsors this week are A Passion for Stamps and Scotch Tapes whose restickable tabs I used on my both my cards....................you will find a bit more about them on the challenge blog and also here on a post I did last week where I also used them.

Have a good weekend everyone and as always, thank you so much for popping by.

Monday, November 21, 2011

A crane takes flight


Good Morning everyone, well I hope it will be when this pops up as I am scheduling it as by now I should be checked into hospital and become robotic linked up to machines and a "probe".....don't much like the sound of that bit.........monitoring my hearts activity for a couple of days. To say I am petrified is an understatement, not so much by the tests, more by what they may find, although they have already told me it will be a few days before I get all the results as they need to be "analysed". And being removed from my craft desk and computer will be a huge wrench, so I guess I will have to be a virtual crafter and dream cards for a while.

My share for today is one of the samples I have just finished for Sue of Animal Spirit stamps, this one uses the lovely Crane stamp and I have combined it with a bit of inking and brayering. I stuck with two colours of Adirondack dye ink, butterscotch and hazelnut. The trees are Inkylicious as is the sentiment. I stamped the crane onto Copic cardstock and coloured with Copics.

Hope you all have a good day and as always, thank you so much for dropping by.


Wednesday, September 28, 2011

A little bit Autumn


Good Morning peeps, a mega quick post before that thing called work takes hold of my day.

This week seems to be rolling by all too quickly and it does not seem possible that tomorrow is Freebie Friday again at Sir Stampalot. If you sign up to Smudges their newsletter, you will get advance notification what you can grab for free this week.

We have had a couple of days of beautiful weather and the colours of Autumn are appearing day by day and looking absolutely stunning against a backdrop of sunshine, so I thought a couple of shares taking on those rich colours.

The top one is using Penny Black 3817K Tigress, stamped onto a background created with acrylic paints and vaseline, if you've not used this technique it's brill. Paint on a darker colour first (you can dry with a heat gun), then dab the vaseline where you want to reveal that colour after painting on your lighter colours, when that's dry (don't use a heat gun here as it will melt the vaseline) then rub away the vaseline and it reveals the under colour paint. The DP is appropriately October Afternoon and the roses were made using a Marianne die.


My second share is this beautiful Stampendous stamp SSC1123 Fairy Queen, stamped onto a brayered background and coloured with Copics. The DP is as above.

Monday, September 26, 2011

A real Passion for Stamps


Hello peeps, did you all have a good weekend ?

Mine sort of passed by in a flash, hubby's has been poorly for the last week and somehow all those things I planned to do never quite got accomplished. Never mind, I can at least share a couple of my sample cards I made using more of Ruth's lovely artwork which you can buy here at A Passion for Stamps.

The top card..................yet another easel I know, is Ruth's Acidanthera flower. I have made one or two cards with it, but each time it said to me "try making me into a Poinsettia" so I had to give it a try and I think it's quite effective. I printed the image out several times, cut the flower heads out in decreasing sizes so I could decoupage them, after colouring with Aquamrkers, inking with versafine frost the spraying with Glimmer Mist pearl to make them flexible to shape and of course give a lovely sheen to them.

The sentiment is Penny Black 3227K Hope is Born, I really have fallen in love with this sentiment and it's popping up on quite a few Christmas cards this year. A bit of distressing with TH fired brick and the easel was cut with Go Create dies.

My second card a leap from my comfort zone but when Ruth sent it to me and said she understood if I didn't use it, there was my challenge.............so I lightly coloured the Mannequin image with Copics, used some Cosmic Cricket DP, pins, bits of ribbon and lace and there was my card. The measuring take is also from the DP stack.

Thanks for visiting and hope you have a good week................and get some of the sunshine they forecast in the UK...............I'm a bit of a sceptic when it come to the weather forecast so shall wait and see.

Wednesday, September 14, 2011

Inspiration from the most unlikely places


Good Morning peeps, hope you are all having a good week.

'Puter' problems seem sorted I am pleased to say and I've got so much added virus protection now I should withstand all comers, I can but hope. So a couple of shares, both much of a muchness using a stamped image and a digi image just to try and prove to myself that I can be versatile if I really try.

Before I launch into my cards, a heads up that it will be Freebie Friday again tomorrow at Sir Stampalot, so if you have not already signed up for Smudges newsletter, click here to be sure of getting advance details of this weeks freebie offer.........remember, whatever it is will only be available for that one day.

Now I'll tell you the same as I told Ruth of A Passion for Stamps about how the idea behind both these cards came into being...........last Friday evening as it was getting dusk I was collecting acorns in one of the paddocks.........as you do............ a big full moon was just rising and a pair of pheasants strutted out from the headland of the adjoining field in front of me............and there was my card !!


In both I have used simple masking and brayering to create a background using the good old Speedball brayer and Adirondack dye inks slate and pitch black. I used the slate first to create a misty look, then went over the top section with the black to create more shadow.

The sentiment on the top card is Penny Black 2905H and on the second from a Sheena Douglass set. The grasses are Penny Black 3381K and the the bird at the top is one of Sue's newer Animal Spirit images which you can purchase here, stamped very simply with versafine back and embossed with detail clear.

The pheasants on the second card were drawn by Ruth and were printed out in two sizes onto Neenah cardstock, I was really quick the the old detail clear and was able to emboss them then added a bit of grey here and there with a Copic pen.


Monday, September 5, 2011

American seam binding.......you just have to try it......

Good Morning peeps, hope everyone had a good weekend.


I had planned on posting this one last evening until I discovered Sky Arts had a whole evening dedicated to Queen..............today would have been Freddies 65th birthday........so of course I ended up glued. Seen lots of it before, but you can never have too much Queen !!


Apart from that my weekend was a bit crafty and I even managed to fit in a trip to Sir Stampalot as there were a few bits and pieces I was in urgent need of'................as if, but any excuse goes.


And I also received a package from Sarah at Pretty Little Ribbons with some American seam binding and bakers twine. I've been wondering for ages what the seam binding was like and boy, is it gorgeous. It's soft and flowy and comes in several pretty colours, but I also tried colouring the white with distress inks and it works brilliantly and still retains the lovely soft feel.


The card above has some of the green and the one below using A Passion for Stamps new thistle has the white coloured with TH dusky concord - dab some direct from the inkpad onto a silicone sheet, spritz with water and scrunch the ribbon about in it, then dry with your heat gun.


So my shares, well it's another with Penny Black 4210K Floral Story. To begin with I painted a frame cut with Nestability Fleur de Lis with copper acrylic paint and also a piece of mountboard. When dry (I used a heat gun) I smeared vaseline round the edge of the mountboard and painted white acrylic all over, dried then wiped away the white paint from the edges...............the vaseline acts as a resist. I then masked the edges and stamped the image into the centre and coloured with Copics.


On to my second share using the thistle. I re-sized it and printed out a border to compliment the main image, did some zig zag stitching along the edges and colours this and the main image with Aquamarkers.


Thanks for visiting peeps, have a good Monday.


Friday, August 26, 2011

First day at school


We have a new challenge for you at Allsorts where Fleur has chosen the them 'Starting School/back to school'. Now I know there are loads of lovely stamps out there that fit this theme perfectly, but none are here in fantasy land, so I was a little bit stumped.


After much head scratching I decided to use one of my Sarah Kay images, she is a bit of a Country girl and has no school uniform and unsure what to expect on her first day at school, so is taking a rather large picnic basket to share with her new friends and some flowers for the teacher.........................I know, fantasy kicking in big time.


I coloured her with Copics , used Doodlebug DP from which I made the pom pom flower, added some swirls cut with a Sizzix die and added a computer generated sentiment.


Enjoy the weekend whatever you have planned.


Monday, August 1, 2011

Welcome to the Stampalot Garden Party

Hopefully Blogger is still playing the game with me and this will pop us as scheduled on the 1st August for the new challenges at Sir Stampalot and Penny Black at Allsorts.

Today we should be in the beautiful Greek isle of Santorini, but there is one element that spoils my trips here and that is those poor little donkeys making repeated treks up and down the steep hillside to ferry visitors to the village above. The family all tell me I am sad and I am in total agreement, the only difference is my sadness is that these poor creatures are exploited in the burning heat day after day.


OK, off my high horse now, I know that's one animal rescue I cant deal with so I will tell you about the challenges, at Stampalot we have the theme of "Whatever you Fancy" and Penny Black at Allsorts "Free and Easy", so basically both totally open to create what you like.


My Stampalot creation is a sort of concertina box card, I'm sure there is a proper name for it but not really sure what this is. I stamped and coloured several Molly Blooms stamps and created a little scene, took me the best part of a day to do this one but really enjoyed it even if it is outside my comfort zone.

My Penny Black make above uses the lovely image Penny Black 4076K Gift of Flowers and I did some paper piecing for her dress and hat and coloured the other parts with Copics. The DP is Scribble Scrabble and the ribbon threaded through a Marianne die.


Thanks for visiting and have a lovely weekend.


Saturday, June 25, 2011

Lemon and Lime and more !


Helene is our host at Allsorts this week and I admit I totally lost the plot here hence several cards. I had prepared my post, thought I had the weeks wrong so changed it all yesterday only to find I was right in the first place.......are you still with me or as confused as I was ?

So the theme definitely is Lemon and Lime, but thought I might as well share all the cards. The one up top uses the gorgeous new lily stamp Ruth created at A Passion for Stamps. I used Hero Arts F2365 to stamp the background with TH pumice stone and mounted onto a mat punched with MS around the page 3 dot scallop and lightly shaded the edges with the same inkpad. The image is coloured with Copics and decoupaged.


My second card is one of the samples I made for a Stamp Addicts programme using the Courting Couples silhouette stamp sheet. The background is stamped with Hero Arts K5056 friendship writing then the image stamped over using Brilliance orchid. The DP is Bo Bunny and I punched a border using MS garden trellis.


And the one above is the original one I did for Helene's Lemon and Lime theme. I stamped a piece of lemon bazzil with Hero Arts S5264 Antique flower background using Hero chalk ink soft green, The ovals are cut with Nesties and the butterfly is from Hero CL383 set and coloured with Aquamarkers. The sentiment is from Darkroom Door.